Rebuild Your Brakes
REBUILD YOUR BRAKES
Part 1 : Drum Brakes The Fix for Onand Off-Road Machines
Len Vucci
Skip through the contents of any motorcycle publication and you’ll find scores of ads hawking performance components. Virtually all of these advertisements concern engine and chassis modifications, and offer power, speed, comfort or beauty. Worthwhile improvements, all of them, but of little or no consequence when that dozing driver runs a red, forcing you to choose between a parallel-parked 1959 Cadillac, an oncoming 18-wheeler, or a fistful of Magura. (Off-road enthusiasts may substitute earthquake-induced chasm for dozing driver, jagged sheer cliff face for GM auto, and errant bull moose for oncoming truck.) No choice, obviously.
SCOPE
With few exceptions, the braking systems of contemporary motorcycles provide an excellent degree of stopping power if properly maintained. The purpose here is to outline the basic procedures necessary to keep those brakes in first-rate condition.
In this month’s installment we’ll cover various drum-type braking systems. It will be applicable to both onand off-road
vehicles. Since there are so many different versions of the basic drum types, we’ll offer a general procedure which will cover them all, and give specific information where necessary.
BASIC PROCEDURES
Following a simple set of guidelines, you will be able to determine what level of maintenance, if any, is required to ensure safe and efficient braking. Simply stated, it consists of (1) Operational check. How well or badly do your brakes work? (2) Component inspection. Do linings and drum show unusual signs of wear? (3) Preassembly preparation. This ranges from simple cleaning to replacement of defective brake components. (4) Reassembly and adjustment.
Details will vary from brand to brand, but the basic procedure remains the same.
OPERATIONAL CHECK
Familiarity with your machine is important and is a prime diagnostic tool. You should become aware of a reduction in braking efficiency, although gradual changes are hard to detect.
Test the brakes from various speeds, exercising maximum caution, to simulate more strenuous braking requirements. Is full control of the bike hard to maintain? Does the rear brake lock too easily? Does it refuse to lock at all, even when applied hard?
The front brake does most of the work, especially for high deceleration stops. Does the front brake require an extraordinarily high amount of applied pressure to stop the bike? Does it fade easily, especially after several moderately hard stops?
Does application of either brake result in a pulsation which can be felt at the brake lever or pedal?
If any of these questions can be answered affirmatively, your brakes are in need of some work. And, if the odometer has been busily whirring for a long time, you may wish to inspect the brakes just for your peace of mind.
BRAKE TYPES
Drum brakes can be divided into two major categories, single-leading shoe and dual-leadipg shoe. (There is also a four-
leading shoe brake, which is actually a pair of dual-leading shoe systems back-toback. and can be treated as such.)
Single-leading shoe brakes are normally found at both ends of dirt bikes and at the rear of most late-model street bikes. SLS brakes were also used on the front of some earlier street bikes, but because of their limited stopping power, are less common in that application.
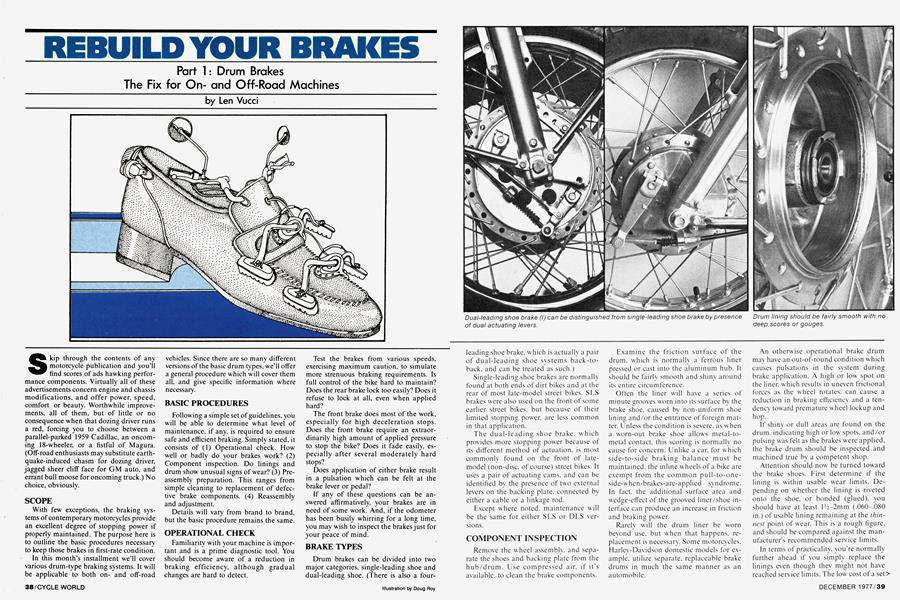
The dual-leading shoe brake, which provides more stopping power because of its different method of actuation, is most commonly found on the front of latemodel (non-disc, of course) street bikes. It uses a pair of actuating cams, and can be identified by the presence of two external levers on the backing plate, connected by either a cable or a linkage rod.
Except where noted, maintenance will be the same for either SLS or DES versions.
COMPONENT INSPECTION
Remove the wheel assembly, and separate the shoes and backing plate from the hub/drum. Use compressed air. if it's available, to clean the brake components.
Examine the friction surface of the drum, which is normally a ferrous liner pressed or cast into the aluminum hub. It should be fairly smooth and shiny around its entire circumference.
Often the liner will have a series of minute grooves worn into its surface by the brake shoe, caused by non-uniform shoe lining and/or the entrance of foreign matter. Unless the condition is severe, as when a worn-out brake shoe allows metal-tometal contact, this scoring is normally no cause for concern. Unlike a car, for which side-to-side braking balance must be maintained, the inline wheels of a bike are exempt from the common pull-to-oneside-when-brakes-are-applied syndrome. In fact, the additional surface area and wedge-effect of the grooved liner/shoe interface can produce an increase in friction and braking power.
Rarely will the drum liner be worn beyond use. but when that happens, replacement is necessary. Some motorcycles, Harley-Davidson domestic models for example. utilize separate, replaceable brake drums in much the same manner as an automobile.
An otherwise operational brake drum may have an out-of-round condition which causes pulsations in the system during brake application. A high or low spot on the liner, which results in uneven frictional forces as the wheel rotates, can cause a reduction in braking efficiency and a tendency toward premature wheel lockup and hop.
If shiny or dull areas are found on the drum, indicating high or low spots, and/or pulsing was felt as the brakes were applied, the brake drum should be inspected and machined true by a competent shop.
Attention should now be turned toward the brake shoes. First determine if the lining is within usable wear limits. Depending on whether the lining is riveted onto the shoe, or bonded (glued), you should have at least l'/2-2mm (.060-.080 in.) of usable lining remaining at the thinnest point of wear. This is a rough figure, and should be compared against the manufacturer's recommended service limits.
In terms of practicality, you're normally further ahead if you simply replace the linings even though they might not have reached service limits. The low cost of a set> of linings balances favorably against the prospect of an additional teardown at a not-too-distant date. If it’s down and doubtful, do it.
On single-leading shoe brakes, there is usually a difference in lining composition and length between leading and trailing shoes. The shoes or linings will normally be marked if that is the case, but don't hesitate to seek additional assistance if you’re not sure of proper positioning.
PRE-ASSEMBLY PREPARATION
The friction surface of the brake drum should first be sanded with #320 abrasive paper, then the interior of the drum cleaned with lacquer thinner or other nonresidual solvent.
The shoes and backing plate should also be cleaned to remove any loose debris.
To improve brake action, a small amount of grease should be applied where the shoes contact the actuating cam. A dab should also be placed on the surfaces where the shoes slide against the backing plate. Because of the high temperatures produced by braking, a special grease is available for that purpose. Wheel bearing grease can also be used, but in any case, keep the amount to a minimum. Grease, liquified by heat, can run onto linings and ruin your efforts.
Unless new linings are installed, sand the friction surfaces of the shoes with #320 paper to break the glaze and remove any high spots.
Just prior to reassembly, clean the linings with solvent to remove any grease or oil. Do not allow any oil (finger prints are oily) to contact shoes or liner before reassembly.
REASSEMBLY AND ADJUSTMENT
Insert the backing plate into the drum, and replace the wheel assembly and its components.
Single-leading shoe brakes will require a simple cable or rod adjustment to suit the rider’s preference.
Dual-leading shoe brakes will need an adjustment to equalize engagement points and pressure.
On units which use a rod to link the two actuating levers together, loosen the lock nut and adjust the rod to loosen the second lever and brake shoe. Rotate the wheel in a forward direction, slowly taking up the play in the brake cable adjustment. Stop when you can hear the shoe just begin to scrape the rotating drum.
With the wheel still rotating, turn the rod adjustment to the point where the second shoe just begins to touch the drum. Without disturbing this setting, tighten the lock nut on the linkage rod. then adjust the brake cable for the feel you desire.
On DLS brakes which are connected by a cable (later BSA-Triumph with conical hubs, for example), the procedure is different. Turn the cable adjuster on the handlebars clockwise so it is fully seated. Remove the rubber plug from the hub. Using a blade screw driver, turn one of the two shoe adjusters until the shoe contacts the drum and the adjuster will not rotate any farther. Back oft' the adjuster two clicks, and repeat the process for the other shoe. Adjust the brake cable for the desired lever feel.
BREAK-IN
If you’ve been conscientious in your work, the reconditioned brake assembly is ready to work for you. If possible, allow1 a couple hundred miles of stop-and-go riding to accumulate before you really put the brakes to test. This easy break-in period will assure good operation and longer brake life.
TO COME
To satisfy the needs of the remainder of street (and Rokon) riders, look for “Brakes, Part 2.” We'll deal with the dise and caliper and give you a handle on keeping the hydraulics of the system working just as well.