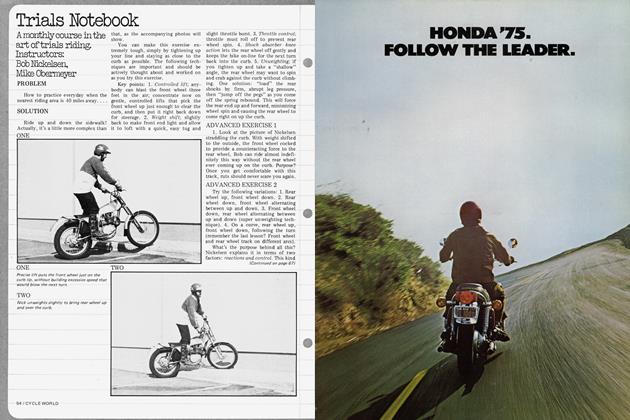
Road Riding
ROAD RIDING
DAN HUNT
BASIC STREET RIDING MANEUVERS
This time I'll be telling you what you may already know. But for those who are new to the sport, a review of basic maneuvers will be useful. With them, I'll try to lay a foundation for the more subtle techniques of road riding. I'm not so interested in explaining what, but why you do certain basic things, and what you are looking for in terms of a standard of execution.
THE START
Your engine is running and you've flicked it into first gear with your foot. For moderate getaways, you twist the throttle until the engine is turning over at about two and one-half times the idle speed. Then your left hand slowly releases the clutch lever until the clutch engages and the bike begins to roll. Simple enough. Everyone knows that. But what people don't know, or at least practice well, is keeping a straight line as they start off. Control, the kind that keeps you master of your machine at all times, begins here.
The factor that seems to contribute most to a sloppy start is not the hand actions that open the throttle and release the clutch, but the body and leg motions that accompany it. So if you have trouble staying within the traffic lane as you start, you should take a careful look at what your feet and legs are doing.
You can start either from a sta tionary position with both feet on the ground (in which case you've been using the front brake lever to keep the motor cycle stopped), or you can start with only one foot on the ground, and the other on the footpeg.
in tne start with both teet on the ground, you should begin rolling, and when you are moving about five mph, raise both feet simultaneously to the footpegs. If you don't raise both feet at the same time, the reaction created by the off-center movement of one leg will cause the bike to bank, which of course results in a turn. You can counterbalance the tendency to turn by shifting your body, but why bother with the extra monkey motion if you can avoid it? Moving both feet up to the pegs is a simple, short action.
(Continued on page 106)
Continued from page 104
The most common mistake in this two-foot start is to postpone raising the feet until the bike is 100 feet past the intersection and traveling at 30 mph. It’s wrong for three reasons:
1. You run out of rpm in first gear and then have to rush your shifting foot to the lever to catch second gear. This inevitably results in bike and rider wobbling off to the side by four to five feet, a great way to anger your friend who happens to be riding in the lane alongside you.
2. If a minor crisis happens at the intersection—a car turning left against the light or someone stopping to turn into a gas station—you have no control. Your feet are dragging on the ground, and you don’t have use of your rear brake. As intersections are usually oily and slippery, you will then find out how exciting a front-brake-only stop at full force can be.
3. If the above reasons aren’t enough, it should be duly noted that guys who drag their feet from starts look like absolute jerks—not only to the general public, but to the motorcyclists all around you. These days, chances are about one in 15 that there will be a motorcycle enthusiast either on a bike or in a car at any busy intersection. Can you guess what he’s thinking if you can’t perform the simplest act in motorcycling without a putrid display of basic incompetency?
The one-foot start is a must in many situations. . .particularly on hills, up or down, or in creeping traffic where you may have to stop suddenly just after you’ve begun rolling.
In this type of start, the foot that operates the rear brake lever is on the peg to keep the bike from rolling. When it is time to roll, throttle is advanced and clutch released smoothly. As the bike begins to roll, the foot on the ground is used to push away gently and straighten the bike. As soon as possible, usually no more than 10 feet, you should raise the ground foot to the peg, hopefully in a smooth, tight movement that avoids disturbing the lean of the bike. ^
Continued from page 106
STOPPING
This is really hard for lots of people, judging by the way they do it. It is a complex maneuver sometimes, because it involves coordination of separate front and rear brakes, and successive shifting from higher to lower gears. Then at the last moment, the feet have to go to the ground to keep the bike from flopping over and the clutch has to be pulled in to keep the engine from stalling. There are some extra decisions available at the moment just before full stop, so, understandably, it does cause trouble for a new rider.
To simplify things, you should first separate the act of stopping into two separate actions. Before you can stop, you must slow down.
Slowing down involves shutting off the gas so that the bike decelerates. Additionally, you apply the brakes. For the last 50 years, motorcycling people have been debating whether to use front brake only, rear brake only, or both brakes at the same time. This is because front brakes on old-time bikes weren’t good for much more than holding the bike on hills. This was particularly true with the big, old Harley-Davidson 74s. Since the only people who cared how you stopped in those days were the cops who rode those 74s, they naturally told you that the back brake was the only one to use for stopping, because in reality the back brake was indeed the only one that could stop the bike. They also didn’t go into downshifting because downshifting was a pain on those ancient porcine police critters.
Okay, so nowadays downshifting is easy, and the front brakes really work. So good do they work that they can provide more than one gravity of stopping force.
If you have a modern-day machine, there is only one way to apply the brakes. That is together and smoothly. Furthermore, you apply the brakes only when the bike is as near-vertical as possible, because the vertical position provides the best stopping traction.
In an unhurried stop it is best to downshift periodically as you slow down. Thus the engine can help you decelerate, and, more important, you can keep your engine turning in its healthiest rpm range so that you are always ready to accelerate if conditions change.
In downshifting, the most important thing is to match your engine speed to the next lower gear as you change gears. The goal is smoothness, which pays off in less stress on the engine, gearbox and final drive, and also helps to minimize rear tire wear. There is no textbook answer to achieving smoot mess in downshifting. It is attained by experience with your own machine, listening to the changes in engine speed, and noting how smoothly the shift occurred by measuring your own jerkiness or lack of it in accomplishing the downshift.
(Continued on page 112)
Continued from page 107
The basic downshift involves pulling in the clutch lever so that the engine runs free, momentarily racing the engine to a higher speed, while at the same time kicking the gear lever down into the next lower gear, then releasing the clutch lever while at the same time shutting off the throttle. There’s nothing more to say about the sequence.
Where it gets difficult is when you are trying to brake rapidly at the same time. And once you have experienced this complexity of action that results in rapid deceleration of a machine, you can appreciate the coordinated skill of a road racer who may downshift and upshift more than 300 times every lap on a reasonably complicated circuit.
Before you try the same simultaneous action, first get your basic downshifting technique together without using the brakes. This can be done in a day’s riding out on a winding country road. Go just fast enough so that you must slow down to enter each bend. Instead of using the brakes, downshift to use engine braking to get you into the turn. Plan ahead or you’ll find yourself in trouble.
Once your downshifting is smooth enough, add your rear brake to the slow-down, applying it gently—not as a real factor in stopping, but as a means to teach yourself the added coordination necessary to apply that brake smoothly while you’re busy downshifting. Remember not to apply it hard, because it tends to lock every time you pull in the clutch to downshift.
To bring the front brake into the downshifting sequence requires that you learn a new way to hold the throttle.
Instead of gripping the throttle like a baseball bat, you now have to take your pointer finger and your big middle finger and drape them over the front brake lever. You will find that you now can apply the front brake with those two extended fingers and yet still be able to turn the throttle. Again, there is no easy way to get used to this technique; practice and many mistakes are > the only answers. Do it gently at first, and do it where you have room so that a mistake won’t put you into a rock wall. Your technique can be considered together when you can downshift smoothly, working the throttle for gear speed synchronization, without causing any change in your finger pressure on the front brake lever. Remember that the front brake is the one that provides the major stopping force, while the back brake is used only lightly to avoid locking up the back wheel and setting the bike into a slide.
Now we can get back to stopping completely, which is probably academic if you’ve already practiced and learned the above.
Nonetheless, your stopping technique may need some checking. First we’ll assume that you’ve slowed your machine to about 10 mph and have backshifted down to at least second gear, if not first.
The basic sequence that is necessary for a smooth, controlled stop follows:
1. Keep decelerating, using front and rear brakes, until the engine speed gets low. At that point you must pull your clutch in to avoid stalling the engine.
2. You must decide which foot you are going to drop to the ground to steady the machine. The best foot to drop is usually the one that operates the gear lever, allowing you to keep the other foot on the peg where it can continue to operate the rear brake.
3. Lean the bike slightly toward the side on which your foot will drop to the ground. If you don’t, you’ll have to drop your braking foot, and totally rely on your front brake to complete the stop. This is fine, if you’ve been relying mainly on your front brake, but most of the time you’ll find that you’ve been using mostly your rear brake just before a complete stop. This is a natural tendency because you find yourself wanting to avoid the compression of the front forks that comes with application of the front brake just before the complete stop.
4. As an added bit of virtuosity, kick your bike into neutral, just after you squeeze the clutch lever and just before you drop your gear-lever foot to the ground. This takes a bit of sensitive toe-touching but is worth the trouble if you find that your gearbox is reluctant to yield neutral when it is stopped, g] To Be Continued